Secure your NGINX server with HTTPS by following this step-by-step SSL installation guide. This tutorial covers essential commands, best practices, and configuration tips for seamless implementation.
Why Install SSL on NGINX?
SSL/TLS certificates encrypt data between your server and clients, enhancing security and boosting SEO through HTTPS. NGINX, a high-performance web server, supports robust SSL configurations to protect against threats like man-in-the-middle attacks. Implementing SSL also ensures compliance with modern browser standards, reducing warnings and improving user trust.
Prerequisites for SSL Installation
Before starting, obtain an SSL certificate from a trusted Certificate Authority (CA) like Comodo or Digicert. You will need your domain’s private key, server certificate, and intermediate certificates, typically provided in a ZIP file. Ensure NGINX is installed and running on your server, with root access for file operations.

Step 1: Prepare Certificate Files
Copy your SSL certificate files to a secure directory on the server, such as /etc/ssl/certs for certificates and /etc/ssl/private for the private key. Set restrictive permissions to prevent unauthorized access: use chmod 600 on the private key file. This step safeguards sensitive data from exposure.
Combine the server certificate with intermediate and root certificates into a single bundle file for efficient NGINX handling. Run the following command in the terminal:
cat your_domain.crt intermediate.crt root.crt >> bundle.crt
Or, if intermediates are bundled:
cat your_domain.crt ca-bundle.crt >> bundle.crt
Move the resulting bundle.crt to /etc/ssl/certs. Verify file integrity to avoid installation errors.

Step 2: Configure NGINX for SSL
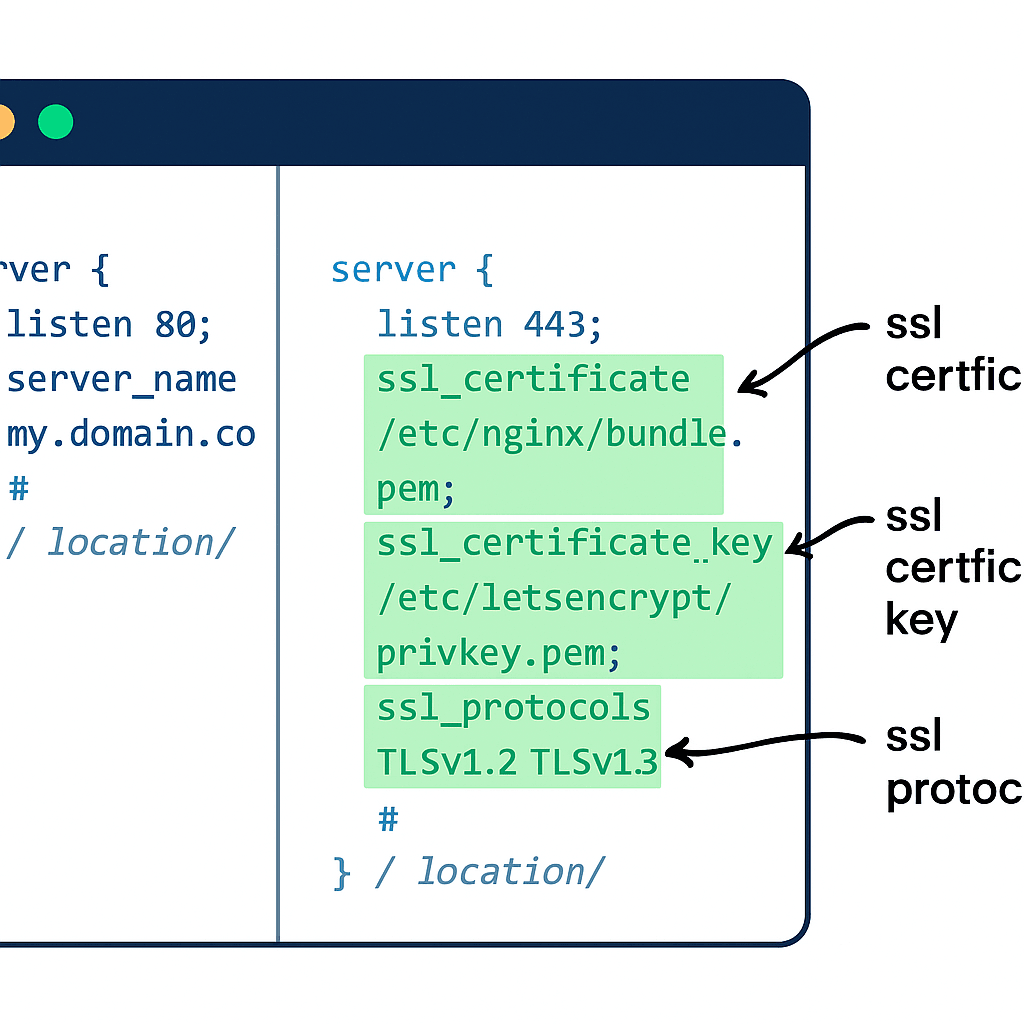
Edit your NGINX configuration file, typically located at /etc/nginx/sites-available/default or a site-specific file. Duplicate the existing HTTP server block and modify it for HTTPS by adding SSL directives. Specify the listen port as 443, enable SSL, and point to your certificate files.nginx+2
A basic HTTPS server block example:
server {
    listen 443 ssl;
    server_name yourdomain.com;

    ssl_certificate /etc/ssl/certs/bundle.crt;
    ssl_certificate_key /etc/ssl/private/yourdomain.key;

    ssl_protocols TLSv1.2 TLSv1.3;
    ssl_ciphers ECDHE-RSA-AES256-GCM-SHA512:DHE-RSA-AES256-GCM-SHA512;
    ssl_prefer_server_ciphers on;

    location / {
        root /var/www/html;
        index index.html;
    }
}
Include the HTTP server block to redirect traffic to HTTPS:
server {
    listen 80;
    server_name yourdomain.com;
    return 301 https://$server_name$request_uri;
}
Test the configuration syntax with nginx -t before proceeding. This setup enforces secure connections and optimizes cipher suites for performance.

Step 3: Enhance Security with Best Practices
Incorporate advanced SSL settings to strengthen your setup, such as enabling HTTP Strict Transport Security (HSTS) and OCSP stapling. Add these to your HTTPS server block:
add_header Strict-Transport-Security "max-age=31536000; includeSubDomains" always;
ssl_stapling on;
ssl_stapling_verify on;
resolver 8.8.8.8 8.8.4.4;
Increase keepalive timeout for efficiency: keepalive_timeout 75; in the http block of nginx.conf. Disable weak protocols like SSLv3 and prioritize strong ciphers to mitigate vulnerabilities.
For self-signed certificates during testing, generate one using OpenSSL:
sudo openssl req -x509 -nodes -days 365 -newkey rsa:2048 -keyout /etc/ssl/private/nginx-selfsigned.key -out /etc/ssl/certs/nginx-selfsigned.crt
Regularly update certificates and monitor logs for issues.

Step 4: Restart NGINX and Verify Installation
Apply changes by restarting NGINX with sudo systemctl restart nginx or sudo /etc/init.d/nginx restart, depending on your system. Check status with sudo systemctl status nginx to ensure no errors.nginx+2
Verify SSL functionality by visiting https://yourdomain.com in a browser and inspecting the certificate details. Use online tools like SSL Labs’ SSL Test for comprehensive analysis, confirming A-grade security. If issues arise, review error logs at /var/log/nginx/error.log.
Troubleshooting Common SSL Issues on NGINX
Mixed content errors often stem from HTTP resources on HTTPS pages; update all assets to HTTPS. Permission denied errors require checking file ownership with chown and chmod commands. For chain mismatches, re-bundle certificates correctly. Always back up configurations before edits to avoid downtime.
Conclusion
Following this NGINX SSL installation guide ensures a secure, SEO-friendly website. Regularly renew certificates and stay updated on TLS best practices for ongoing protection.
Related Products
- Comodo
PositiveSSL Certificate (DV)
₹1,450.00/year Select options This product has multiple variants. The options may be chosen on the product page


